Saturday, August 24, 2013

Logo Logo Logo (and merch)

I can't believe I never posted this! We had a logo design contest for our league, and looky here, I won! Here is the winning design (credit goes to my Phil for the idea- those are a gaff hook and a halibut hook, both references to commercial fishing):

 And then this one is the final version, with the new team colors. Orange for the sunset, since we're the westernmost Southeast Alaska community and the sun sets over the ocean here. The blue is for the ocean and the near-constant rain.


We took the advice presented in this derbylife article on branding derby as we were finalizing the logo.We can pull out just the "Slayers" or just the skull or whatever to print on smaller items, too. I want to do nail decals!

I used Inkscape for the design- my only word of advice is to start with a CMYK file. Otherwise we haven't had any trouble with getting merch made. So far we had T-shirts, tattoos, and stickers. The blue is causing a few problems- it's different on everything we have printed. The stickers, which were CMYK screened, are probably the best, although they look royal in this photo, they're actually very close to just the right slate blue. 


We got the stickers from Stickerrobot.com, and they're fantastic. Really high quality outdoor vinyl; I can't recommend them enough. Tattoos are just cheap, but they work fine, from tattoosales.com. And the shirts from bluecotton.com. They had great service and did an excellent print job, although their selection of garments was somewhat limited. We haven't been able to find slim, shaped ladies' style tees in adult woman sizes, just juniors. It seems that women's sized shirts are boxy and wide instead of slim and shaped. What shirt do you use?

Quickie- Sparkle Vinyl Skate Bag

A while back in my "Simple Toe Guards" post, I ended with a teaser about my skate bag... and then never posted about it. A commenter kindly asked, so here's a quickie for you...

I was looking for a skate bag on eBay right when I started derby, because the two tote bags I was using were a little unwieldy for the 1/4 mile walk to practice. I saw this amazing bag, a Schwinn Stingray messenger bag, that looked perfect. Even better, it had a cool "S" on it, which is my first initial, the initial of my first blush derby name (Sarah Shreddington), and the initial for my team, the Sitka Sound Slayers. And best of all, it was red sparkle vinyl. Unfortunately, that one went for more money than I was willing to pay, but I still had red sparkle vinyl on my mind. So, I decided to sew one up for myself.

I'm not sure how I decided to make the Amy Butler Weekender Bag. I think I saw someone else's red sparkle vinyl version of it. There are pattern reviews all over the Internet about this bag, and the overall sentiment is that it's a total pain in the neck, but also worth it. I'm a pretty competent seamstress, so I decided to go for it. And it was a total pain in the neck. I had to make some modifications to compensate for the thickness of the vinyl (fewer layers of interfacing), I used premade piping, and I lengthened the straps to ensure I could carry it over my shoulder. I broke a zillion needles, heavy duty and leather varieties. I sewed much of it with heavy duty thread, which was a mistake because my machine hated it. One of the strap attachments came off right away as a result. It worked much better when I switched to regular thread. I used a sturdy cotton twill for the lining, but somehow despite following all instructions the lining was too big for the bag. I need to remove it and fix it, but I just haven't gotten around to it. I did add some interior pockets to the lining, which is good for tools/mouthguard but bad for catching skate wheels. You can see a little in the picture below how the poorly attached/too big lining is pulling on the top of the bag.


 If I were to make it again, I'd use regular thread, be more careful in making sure the lining fit before I stitched it in, and do that part more carefully. I'd also sew the straps up and down in the strap topstitching instead of just having the horizontal attachment points, which just don't seem like they will last all that long. I intended to make the false bottom and add metal feet, but never got around to it.

I had saved my eBay search for the Schwinn stingray messenger bag, and shortly after I finished making my bag, another Schwinn bag came up for auction. I used Gixen to snipe bid on it (the only way I have ever succeeded in getting anything on eBay, by the way) and got it- for close to half what the first one went for! So now I have TWO red sparkle vinyl skate bags! I used the Schwinn bag for a while but switched back to the Weekender despite the lining issues. The Schwinn bag holds everything, including my helmet, so that's cool, but the messenger bag style hurts my back to carry it for any length of time. My Weekender bag holds my skates and pads and little things, and then I clip my helmet to the straps. For a while I put everything but my skates in the bag and used a skate leash, but it was awkward to walk with the skates on the leash.


I've been using it for about 6 months now, and it's working really well and holding up great, even with the one failed strap attachment. Unfortunately, since I made the bag our team voted on orange and blue for our colors! I love the colors- orange for the sunset since we're the westernmost town in Southeast Alaska, and slate blue for the water and the constant rainy sky. I liked red and black for the Tlingit connection, but it's true that they are a little overdone in derby. The good news though, is that I think the Schwinn bag comes in orange... so I have another eBay search saved!

Oh yeah- I almost forgot to tell you that vinyl is the worst possible material I could have selected for a skate bag, because it doesn't breathe. Right after I finished it, we had a skate clinic and the woman leading it talked about how people's bearings sometimes rust just from being left in a bag with sweaty gear (and I'm guessing that's not in a rainforest or even necessarily a vinyl bag). So I am diligent about removing my gear from the bag and letting it sir dry after every practice. It keeps the stink down, too.

So there's my quick post. I have a couple more not quite ready to go... full toe covers and lift & separate shorts from scratch. So if you want to hear about those, shoot me a comment and maybe I'll get off my duff and do them.

Also, do you think I should have stuck with Sarah Shreddington? (my given name is Sarah)


Thursday, May 30, 2013

Panties!

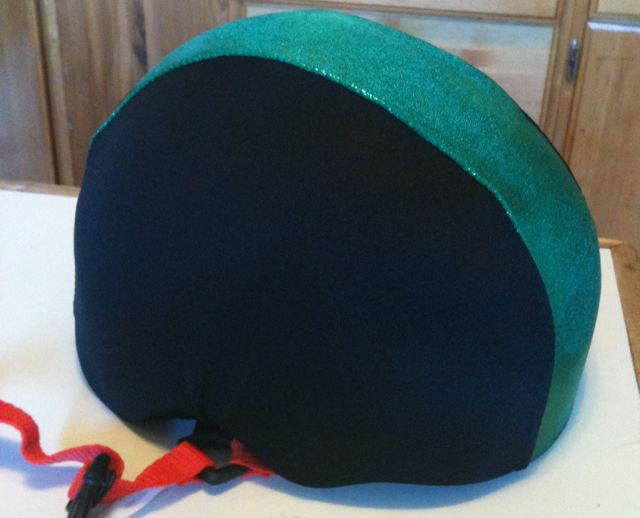
Helmet covers, jammer panties, whatever you want to call them, every derby league needs them sooner or later. In our case, it was sooner- we had a last minute chance to do an exhibition at our local "Wearable Arts" show (Fresh Meat skating down a 3-foot runway? No problem!) and someone said, "wouldn't it be great if we had panties?"

Well, not only do I sew, but I have daughters, and that combo also means I have sparkle spandex in my fabric stash, and/or know who else has it in my island Alaskan town. So I looked for a pattern and whipped up some panties. I have since made a set of reversible panties in my newly-selected team colors, and this post is as much about what I learned in the process as anything, since I can't claim to have made up the pattern.


  • I used this pattern from BurdaStyle
  • If you need a basic tutorial, this one is pretty good. 
  • I found the pattern to be quite large on my helmet- you can see this in the jammer panty on the left and in the pictures on the WoM: Mom blog. To fix that, I just sewed inside my top seams until it fit more snugly. Sorry I don't have a picture- it had the effect of reducing the seam allowance along the top of the curved piece and on both sides of the rectangle by about 1/4". I think I trimmed some off the bottom too.
  • On my second set, the reversible panties, I trimmed the pattern off first to make it smaller- but they ended up a little too small. Better too big than too small!
  • You also don't have to fold under the raw edges for the elastic casing, because jersey knit doesn't fray, it just rolls.
  • BEST HINT EVER! Sulky KK 2000, or if you can't find that, 505 Spray Baste. Both are the same concept- you spray them on your fabric and then it sticks and resticks like a Post-It Note.
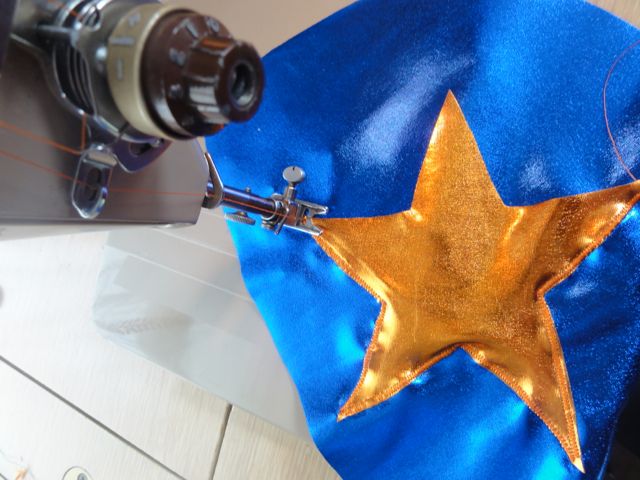
    Sulky is great because it just dissipates or you can iron it to make it disappear more quickly; 505 stays longer and doesn't iron off, which if you overspray can cause problems with the foot sticking, causing the fabric to bunch. It might seem expensive, but with any kind of slippery fabric (velvet anyone?), it's magic. No pinning, no slipping, and it was really great for the star- I just sprayed it on the star, stuck it where I wanted it, and zigzagged over the edges of the star.


    I also used it to stick my layers of fabric together so I could cut out up to 4 layers of thick sparkle spandex accurately at one time. 

The ongoing saga of the reversible panties:

Why, pray tell, would we make a reversible panty? Well, what are you with a star showing on your helmet? What are you if your panty goes on inside out, with no star showing? Yeah, that's why*.

I tried making a reversible panty by making two panties and sewing them together, one in and one out. The truth is... it just didn't work very well. They're bulky and unless you tack them together, they're confusing.


So my new idea is to spray baste a flat piece of fabric to the inside of the side and a star to the outside, then sew around the star, and trim off the inside piece for a second star. I think it will work since the fabric doesn't fray.

*If your panty is inside out, you are a non-scoring jammer. BUMMER!

Monday, April 15, 2013

DIY Skate Leash or Noose

OK, here's a quick project. I skinned my fingertips skating outside this weekend so I have to make it short. The beauty of a skate leash is two-fold. One, you don't have to get (or make, in my case) a bag big enough for your skates. Two, your skates are not in the same bag as your sweaty gear, which noose manufacturers claim will cause premature bearing rusting. You also get to sling your skates over your shoulder and look like a bad-ass or have them out as a conversation starter.

This is the quickest project ever. It took me a lot longer to write it up than to do it. 

Materials:
Approximately 80 inches webbing, 1" wide, any non-stretch material is fine
The same length satin ribbon (optional), 5/8" wide
2 D-rings to fit 1" webbing
Note: I bought all this for about $6 at my local Ben Franklin. You can probably get it for less if you don't live on an island in Alaska. Webbing and D rings are also pretty easy to scavenge or thrift, if you just keep your eyes out. Straps on cheap or old bags, old backpacks, etc. I didn't feel like digging through my camping gear in the basement to find the random lengths I know I have down there. You can also get all sorts of cool webbing, if you live places other than an island in Alaska.

Supplies:
Sewing machine (here's a tutorial that uses no D-rings and hand sews)
Matching thread
Ruler or measuring tape

1. (Optional) Attach ribbon to webbing down the middle lengthwise by sewing a straight stitch close to the edge of the ribbon. I did this by setting my needle slightly off center and then lining up the edge of the ribbon with the middle of the presser foot.


2. Cut a 37"-ish length of webbing and attach each end to the flat part of a D-ring by poking it thorough the D-ring, folding over about 1/2" and sewing it down. I used a wide zig-zag and went back and forth about 5 times to make it really secure and ensure I caught the loose ends of the webbing and the ribbon. You could melt those prior to sewing if you have a flame handy and felt like spending another 5 minutes on this project. 


3. Now cut two 21"-ish lengths of webbing. Form a loop by folding a piece in half, and then attach both ends of this piece to the curved side of one D-ring, the same way you did in 2. Repeat with other 20" piece and other D-ring. That's it! You're done!


Thursday, March 21, 2013

Derby Shorts

If you're here, you know that we derby girls luuuurve our booty shorts. Whole brands have been built on them, in all shapes and sizes and styles. I particularly like the look of Iron Doll's ruched "Lift & Separate" shorts, but at $30 a pop and me a newbie a coupla hundred into gear already, it's not happening any time soon. I am, however, crafty, and as the mother of two girls, yes I have sparkle spandex laying around the house. So of course I googled "DIY Lift & Separate shorts" and was surprised to not find anything. And so here I am.

Before picture of my ass -- I mean shorts.
Before - Pancake Ass!
After picture of my ass- I mean shorts.
After - Lifted! Separated! Ruched!


Today's post is going to be a simple DIY, turning regular old $10 spandex booty shorts from a dance supply store into a ruched style similar to Iron Doll's. I'm probably going to fancify these up another day, and I also traced them to make some from scratch!

What you need:
  • Spandex shorts, a size or two too big if you have a choice
  • 3-5" of 1/4" wide elastic, the stretchiest you can find. I found that the clear plastic elastic was stretchier and less bulky than the regular white braided elastic, and the white elastic I had was stretchier than the black elastic I had.
  • 1 to 1-1/2 yds 1/4" wide ribbon, cord, or 1/2" wide strip of scrap spandex

Tools:
  • Scissors
  • Sewing machine & thread (sorry, I know. I have an idea for hand sewing, but I haven't tested it yet.)
  • Tapestry needle or safety pin or pencil or skewer

The first thing you want to do is turn your shorts inside out and find the back seam. If there's a tag sewn in the seam, cut it out, but don't cut the stitching.

Next, fold the shorts in half at the seam, so the seam is free from any other fabric. Pin one end of your elastic to the top of the seam just under the waistband. Set your sewing machine to a medium zig-zag stitch and tack down the elastic by sewing back and forth in place a few stitches. Remove the pin, and lower the needle into the fabric.


Now, grab the elastic an inch or so below the sewing machine foot, and stretch it as far as it will go. It will get skinnier. If it breaks, just start over and don't stretch quite so far (only the flimsy plastic elastic sometimes breaks). 


I grabbed it here...
And stretched it to here!


Okay, so this is the hardest part. Line up the stretched out elastic over the seam allowance. Grab the waistband of the shorts behind the sewing machine foot, and start sewing the stretched out elastic down onto the seam allowance. I don't have a photo of this because it takes two hands. Keep sewing until you run out of elastic or the seam starts to curve, indicating it's turning into the part that's between your legs. Clip the elastic and threads, and- voila! You have back seam ruching!


This is where it helps to have shorts a size or two big- the looser they are, the more fabric you have to gather up and give you the ruched look. Be warned, too; booty shorts sold at dance stores run small. At 5'1" and 118 lbs not very many people would classify me as a large, but these shorts were a medium and didn't have much room to ruche.

Now for the easy part- the side ruching. Turn your shorts right side out and lay them flat as you would wear them, with the seam in front and the sides folded. Make tiny (really, tiny) snips about every inch down the side fold. The ones in the photo below are a little big.


The beauty of nylon/spandex is that it doesn't run or fray, so those holes are just fine like that. Cut your ribbon/cord/fabric strip in half. Now thread it through your tapestry needle and, starting at the bottom and leaving a tail, weave it in and out of the little holes. Wen you get to the top, go around the waistband and weave back down through the holes again. You could also just as easily poke the ribbon/cord/fabric strip through the holes with a pencil or a skewer, or pin a safety pin to the end and use it to weave through. Repeat on the other side.
Bottom up

Weaving

Come around the waistband and back down

All the way back to the bottom
When you're done it will look something like this

Once you have done this, then tighten the sides as much as you'd like. I had to fiddle with my strip of fabric to make sure the sparkly side was out. Tie knots at the ends of your strings if you want.


And you're done! Don't they look so much better? I couldn't get a very good photo from the front, so I'm going to show you my ass again.


What's next? I prefer a wide waistband, so I'll probably replace the thin elastic waistband with a wide spandex one. I might also add a little length to the legs with a contrast band to complete the look.


Saturday, March 2, 2013

Toe Guards - simple

So I'm a new derby girl, right, on a totally newly formed team, the Sitka Sound Slayers. The first day of practice, I showed up in my new gear, really not knowing anything about anything. My gear was a Christmas gift, saving me from my tendency towards over-analysis and under-decision-making. But that meant I knew even less about what I was wearing-- unable to participate in the gear chit chat going on, unable to answer what kind of skates I had on (Riedell Darts), if they were leather or PVC (PVC), or did I have hard or soft wheels (hard, 92a). I also noticed that almost everyone else had a strip of leather over their skate toes, and I did not.


When I got home, I hopped onto ye olde internets and did a little research. I discovered that one wrecks one's skate toes when one falls, hence the need for reinforcement. I discovered I could buy toe guards for a mere $8 (plus shipping, 'cuz, y'know, I live on an island in Alaska), or there were much fancier toe guards for $20-30 that looked like they might not slip to the side like the strips. I looked at both of them and thought, "I can make those!" I found a hand drawn pattern on the Internet, cut it out in paper, and found it wanting. And so here I am. I planned to just make the fitted toe cap style, but the fact is, we were starting to fall in practice, my toes were getting scuffed, and I needed to protect them now! February was a bit of a tough month, so I didn't have time to engineer the capped toe protectors I wanted. Strips it was!


So for my debut post, I present to you, DIY strip toe guards, complete with a pattern. Pretty basic if you're used to DIYing it, but it'll be nice to not have to reinvent the pattern.

Toe Guard Strip Pattern

DIY Roller Skate Toe Guards

Materials/Tools:
About 8x6" square of durable no-fray material. Leather is probably best, we'll see how vinyl holds up.
Sharp scissors
X-Acto knife
Cutting mat or scrap corrugated cardboard
Pencil
Leather/fabric hole punch (optional)

 Instructions:
1. Print pattern. Adjust print size as necessary so that the box is exactly 1" square.
2. Cut outline of pattern. Fold in half lengthwise to cut out toe stop hole.
3. Trace outline onto leather.  Trace toe stop hole onto pattern.
4. Using sharp scissors, cut out toe stop.
5. Using knife (and a cutting mat or piece of scrap cardboard), cut out toe hole. Alternately, you can just cut along the + and poke the toe stop through that.
6. If desired, trim length of toe cover to one or two holes.
7a. For a generic fit, mark lace hole positions by poking a pencil through the small circles and mark the leather. Punch holes using leather punch (2nd to largest size on mine), or stick your X-Acto blade in and spin it to make a hole.
7b. For a custom fit, install toe cover on the toe stop on skate. The nut and washer go against the skate; the toe guard goes between the stop and the nut. Mark hole positions slightly lower (closer to toe) than lace holes and about 1/2" in. Cut holes as in 7a.
8. Install toe guards using your preferred lacing technique! Be sure to install it very tightly, lacing through guard holes that are lower than the eyelets your lace is going through to pull it tight. Vinyl especially will stretch, but so will lighter weight leather.

You can see the prototypes installed on my skates above. The 3-hole one is not stretched very much; I expect it to slip next time we practice. The 2-hole one is trimmed, and stretched tightly over the skate toe. I used the custom fit method for both, but used that placement to place the holes on the pattern. I used sparkle vinyl left from the skate bag I made (upcoming post!), and once I am happy with the prototypes I'll make some out of leather. I'm curious to see how long the vinyl lasts, and if it marks up the gym floor.

Up Next: Sparkle Vinyl Skate Bag (and why that was the worst material I could have chosen)